Select Video only as the stream type and click on the Settings button.
In the Video tab, set the following parameters:
This guide is © Rui del-Negro / Azul SPI. You may place links to this page on your site, you may download or print the guide for your own personal use and you may put it on-line at any other free public site as long as you do not change it in any way and include a link to the original page. Any other use (including, but not restricted to, commercial use) is forbidden without prior written consent by the author. |
The settings I will use in this guide are for high-quality DVD-compliant MPEG-2
encoding. If you need faster encoding (and don't mind lower quality) or if
you're encoding video for web distribution, Video CD, etc., you will need
to make some changes (I have very little experience with VCD/SVCD; if you
do a quick search on the web you'll find several sites with guides about
those formats).
If some settings in TMPGEnc appear to be locked,
this may be due to the fact that you loaded one of the original templates.
To unlock all settings, load a settings file called unlock.mcf, that you will find inside the template\extra sub-folder. Newer versions of TMPGEnc also let you unlock the settings by clicking on the text on the left side. If TMPGEnc starts with a step-by-stop wizard, close it and use the full configuration interface.
Note: Due to the size of the screenshots, this page looks significantly better if you use a screen resolution of 1024x768 or above. |
If you haven't already, start TMPGEnc (by double-clicking on a shortcut or on the excutable file).
Select Video only as the stream type and click on the Settings button.
![]()
In the Video tab, set the following parameters:


| ||||||||||
| Stream type: | MPEG-2 Video
| |||||||||
| Size: | 720x576 (for PAL) or 720x480 (for NTSC)
| |||||||||
| Aspect ratio: | 4:3 Display or 16:9 Display (depending on footage)
| |||||||||
| Frame Rate: | 25 fps (for PAL) or 29.97 fps (for NTSC)
| |||||||||
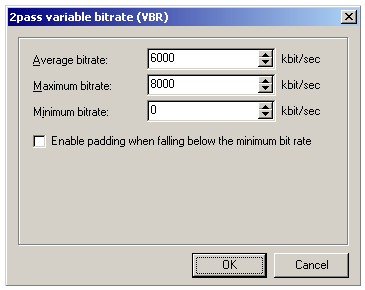
| Rate control mode: | 2-pass VBR
| |||||||||
| Rate control settings: |
The final bitrate on a DVD cannot
exceed 9.8 Mb/s (including sound, subtitles, etc.). You may use a higher
value for the maximum bitrate (up to 9000 or so) if you're going to use compressed
sound or if the DVD won't have any sound. You may want to decrease the bitrate
(especially the average bitrate) if the footage you're encoding is too big
to fit in one DVD. Generally, a value of 6000 for average and 8000 for maximum
will produce good results and allow you to fit about 90 minutes into a 4.7
GB disc (assuming you use compressed sound; if you use uncompressed sound
you'll have to lower the average bitrate value). Some authoring programs
don't like files with bitrates that drop below a certain level, so I suggest
keeping the minimum at 2000.
NEW: I have made a simple bitrate and GOP calculator for DVD encoding.
It will take information about the length of your movie and its format and
suggest values for the bitrate and GOP picture types (described below). You
can find it here.
| |||||||||
| VBV buffer size: | 0 (automatic)
| |||||||||
| Profile and level: | MP@ML
| |||||||||
| Video format: | PAL or NTSC
| |||||||||
| Encode mode: | Interlace
| |||||||||
| YUV format: |
4:2:0
| |||||||||
| DC component precision: | 10 bits
| |||||||||
| Motion search precision: | Highest quality
|

| ||
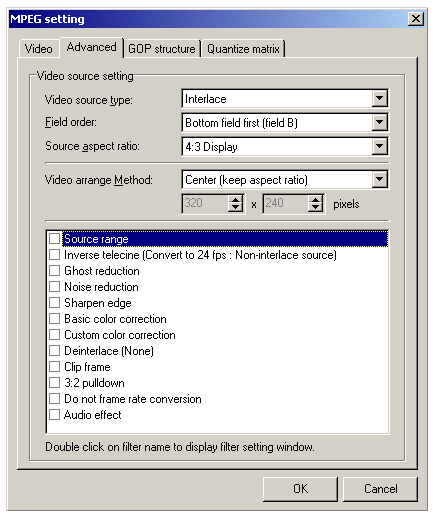
| Video source type: | Interlace
| |
| Field order: | Bottom (for DV) or Top (for analog)
| |
| Source aspect ratio: | 4:3 Display or 16:9 Display (depending on the footage)
| |
| Video arrange method: | According to the "tooltip" in TMPGEnc, this only influences the display window. However, several people have told me this will have an influence in the finished file if the source and destination aspect ratios and resolutions don't match perfectly.
So if your source footage is full-resolution video, any option here should
produce the same result. However, if the source resolution does not match
the standard DVD resolutions (720x576 for PAL and 720x480 for NTSC), you
may need to try different settings to get the result you want. When I have
the chance, I'll do some tests and post a description of what each method
does. | |
| Filters: | Normally
you don't need to apply any, so just make sure none are selected, or processing
will take longer. You may want to use the "source range" filter to trim the
clip or "clip frame" to crop the image. TMPGEnc's filters are usually somewhat
slow, and you only see the result after encoding is finished, so I would
recommend applying all the filters you need in your video editing (or compositing)
program and using TMPGEnc just for the encoding. | |

| ||
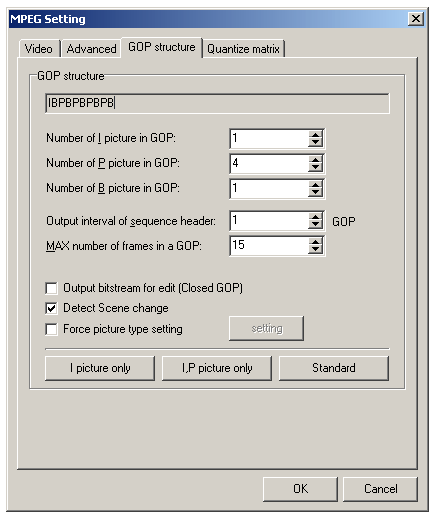
| Number of I pictures: | 1
| |
| Number of P pictures: | 4 (use a value between 1 and 7)
| |
| Number of B pictures: | 1 (use a value between 0 and 3).
| |
| Max frames in GOP: | 15 (for PAL) or 18 (for NTSC).
| |
| Output interval of header: | 1 (very important)
| |
| Output closed GOP: | Disabled (except in special cases)
| |
Note: If for some reason your authoring program rejects your files, try enabling this setting; I've been told that some programs have problems dealing with open GOPs. In general, however, you should leave this off, as you'll get better compression (especially if you use B-pictures). | ||
| Detect scene change: | Enabled
| |
| Force picture type: | Disabled
|
The last tab controls the Quantization matrices:
This subject is too complex to discuss here, and normally you don't
need to worry about it. If you're compressing normal video or photo-realistic
animation, pick Default or MPEG standard from the list box. If you're compressing (non-realistic) animation, pick CG/Animation. This will load appropriate matrices. Here are the settings for the rest of the options on this tab:

| ||
| Output basic YCrCb: | Enabled
| |
| Floating-point DCT: | Enabled
| |
| No half-pixel motion: | Disabled
| |
| Soften block noise: | Disabled
| |
Two more tabs will appear if you select Video+Audio instead of Video only as the stream type. These are Audio and System.
The audio options are fairly straightforward (use the settings that correspond
to the original sound format and a bitrate between 128 and 384 for stereo),
and the system tab lets you pick the kind of stream you want to create. However,
for DVD authoring it's generally a bad idea to create system / program streams. You should create a video only stream and use an uncompressed sound file (48 KHz, 16 bits, stereo) for the audio. Some set-top players will not play MPEG audio; you should leave the sound uncompressed or convert it to Dolby Digital™
AC3 format (for this you will need a separate encoder, or an authoring program
that is capable of converting uncompressed sound to AC3). See you authoring
program's manual for details on how to load and link the audio and video
files.
Now that you have created an encoding template, click on OK and then Save it in TMPGEnc's Templates folder with any name you want (ex., "VBR-PAL-DVD.MCF". Every time you use TMPGEnc, remember to load that template so all your settings are restored. If you install a new version of TMPGEnc, you should re-create the template manually. Old templates may not load correctly.
Before closing TMPGEnc, go to the Options menu, pick Environmental settings and make sure the folder for temporary files
is in a drive with plenty of free space. You may check the other options
here, but most of them aren't very relevant (and the default settings are
fine). If you have a Pentium 4 processor, make sure you have SSE-2 enabled. This should make encoding much faster (although I've been told by several people with Pentium 4 systems that the difference is minimal). If your system has multiple processors,
activate multi-threading, otherwise TMPGEnc will only use the first CPU (if
you only have one CPU, enabling multi-threading will usually make things
slower).
Note: In case you didn't know, TMPGEnc is an abbreviation of the program's original name: Tsunami MPEG Encoder. You can download the trial version for free at the program's site, but now a commercial version (without the time limit) is also available. Despite being relatively slow, TMPGEnc is affordable and widely regarded as one of the best (if not the best) MPEG-2 encoder currently available. Although I am in no way associated with the program or its author, I strongly encourage you to register your copy as soon as possible. I wouldn't be at all surprised if some big company bought it and increased its price dramatically. After all, MPEG-2 compressors of similar quality sell for over 1000 dollars / euros. |